Advanced OBS Transition Techniques

While looking to grow and build a following on streaming platforms like Twitch, one’s visual presentation is everything. Because of the sheer amount of competing streamers that are live at any given time, you need to ensure that your broadcast hooks new viewers right away. Essentially, in order to convert new viewers into loyal followers, streamers need to go the extra mile with their presentation. And the best way that you can showcase your channel’s brand is through great stream overlays, alerts, and scene transitions.

One way to add to your channel’s branding that not all streamers seem to implement is stinger transitions – which are essentially short animations that are used to create a smooth and professional way to switch between scenes. We already covered basic scene transitions in a previous blog post, but in this guide, we’ll be going over more advanced transition techniques.

OBS plugins for Advanced Transitions

Move Transition

The move Transition, which was developed by a Software developer from the Netherlands known as Exeldro, allows OBS users to change scenes seamlessly without needing to cover the screen using stingers.

Sources move to new positions based on the positions given in the corresponding scene, and sources fade out and disappear from sources that are no longer present in the new scene that is being changed. In the case of sources being present in the new scene but not the old scene, they will fade in and appear.

For example, one possible use case for this transition is switching from a just chatting scene to an in-game scene by using the transition to shrink one’s webcam and enlarge the gameplay scene at the same time. If you’d like to use this transition and are interested in supporting its creator, Exeldro has a Patreon. Subscribing to it would help him directly.

Transition Table

Another transition by the creator Exeldro, the transition table (formerly known as transition matrix) is another great advanced transition feature. The main purpose of the transition table is that it allows users to map specific stringer transitions based on the currently active scene and target scene.

The table is basically a dropdown tool that allows users to choose scenes to transition to and from. It also features a search function. Overall, this transition tool can make the process of transitioning to and from different scenes much more easy and organized.

Advanced Scene Switcher

Created by WarmUpTill, the advanced scene switcher is another excellent plugin tool. It essentially allows you to set up macros which, based on certain conditions that you can set, can trigger various different actions in order to customize your stream to your liking. The real power and usability of this tool lie in the sheer amount of different actions and conditions that can be created with it.

How to Set Transition Per Scene In OBS

First and foremost, let’s go over how users can set transitions per scene in OBS Studio. This allows you to have specific transitions for specific scenes. Additionally, keep in mind that this feature is usable within OBS without the use of any of the additional plugins that we touched on earlier.

  1. Open up OBS Studio.
  2. Right-click on the scene that you would like to set a specific transition for.
  3. Select Transition Override and then select the type of stinger that you want to use.
  4. And that’s it! Test out the stinger. It should now work properly.

How to Use Move Transition Plugin in OBS

Setting up the move transition plugin is a fairly straightforward process, and only takes a few minutes. Here’s what you’ll need to do:

  1. Go to the plugin download page.
  2. Select Go To Download. Choose the most up-to-date version, and the correct download based on your operating system.
  3. Extract the zip file. Install the file.
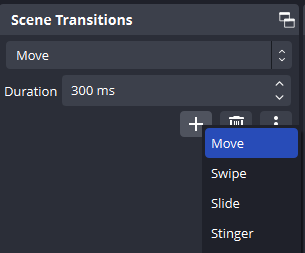
  4. Create a new transition in OBS by going to the Scene Transitions section, selecting the + icon, and then choosing Move from the dropdown menu.From the new dialog, all of the settings can be adjusted.

Here’s how the plugin works:

  • While changing scenes, the plugin will try to match sources in the current and target scenes. These are known as Matched Items.
  • Sources that don’t exist in the target scene but exist in the current scene are classified as Disappearing Items.
  • Sources in the target scene but not in the current scene are classified as Appearing Items.
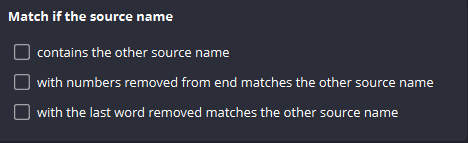
  • You can set the conditions for Matched Items in the first section.
  • There are separate sections for Matched Items, Disappearing Items, and Appearing Items where their behavior can be configured.

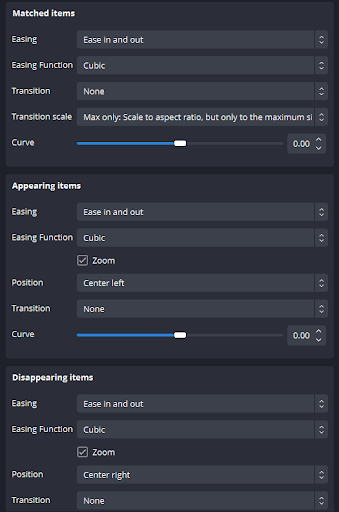
Check out the plugin’s main page for a full breakdown of all the settings.

How To Use Transitions Table Plugin in OBS

The OBS transitions table plugin is even simpler to set up and use, and just takes a couple of quick steps to get done. Here’s the process:

  1. Head to the download page.
  2. Select Go To Download. Choose the most up-to-date version available and select the correct download based on your operating system.
  3. Extract the Zip file. Install it.
  4. Open OBS and go to Tools -> Transition Table
  5. Choose the from scene and the to scene and the transition that’s triggered when the condition is met.
  6. Finally, press Set to make this new transition condition operational. You can have more than one condition set at one time.

And that’s it! Additionally, you can export or import transition tables that you may have created previously.

How To Use Advanced Scene Switcher Plugin in OBS

Finally, let’s go over how to use the advanced scene switcher plugin in OBS.

  1. First, head over to the plugin download page.
  2. Select Go To Download. You’ll be taken to the plugin’s latest release page on Github, scroll to the bottom, and under Assets find the download corresponding to our operating system. Download the most recent version.
  3. Once installed, access the tool in OBS by going to Tools -> Advanced Scene Switcher
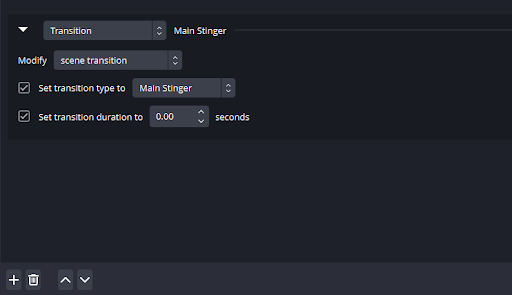
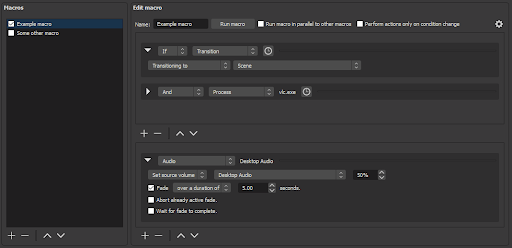
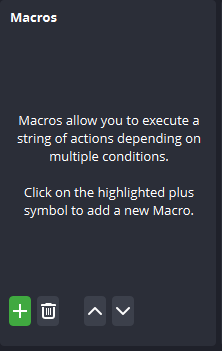
  4. Switch to the Macro tab to set up your first Macro. Each macro contains a set of conditions followed by the corresponding actions to take.
  5. Select the + button in the Macros section and name it whatever you wish. Then select the + button at the bottom left of the macro conditions section.
  • Based on the example condition above, the macro will be triggered when the current scene is scene 2.
  • This is one very simple use of this tool. Once you take a deep dive into the conditions for this tool, you’ll quickly realize just how deep the settings go. Just as many others have commented, this tool is so much more than just an advanced scene changer.

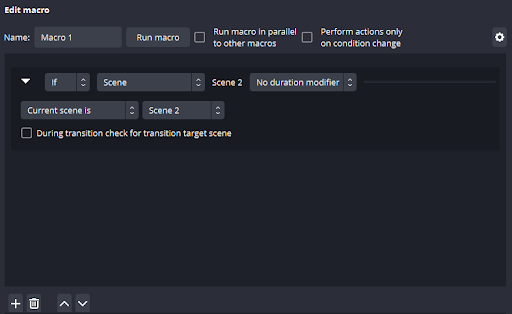
6. Now you’ll need to specify the action that you’d like to be performed for this macro. Press the + button in the macro actions section, and configure the action.

  • In this case, the action will be to set the scene transition to Main Stinger when the defined conditions have been met.
  • Again with the sheer amount of actions available within this tool, it requires a lot of time and experimentation to get to grips and understand all of the functionality that it offers.

Check Out Hexeum’s Scene Overlays

While having great scene transitions for your stream is great, having professional scene overlays are also vital for those looking to improve their stream. So if you’re looking to customize your channel with new overlays and designs, then we suggest checking out Hexeum’s store. 

Hexeum’s website offers a large library of custom designs including camera borders, BRB and stream starting soon scenes, alerts, widgets, and more that can help elevate your live stream and really stand out from the crowd. If you’re looking for ways to improve your channel, then look no further – visit Hexeum’s store today!

This entry was posted in .

Picture of Ben Price

Ben Price

Ben Price is a writer, gamer, and even used to stream on Twitch. His time as a small streamer gave him invaluable insights into the mindset and challenges small streamers encounter. With a passion for video games, he enjoys gaming sessions whether it's on his PC or Switch.

Related Posts

PREMIUM OVERLAYS