In this guide we’re going to run you through all the sizes and dimensions related to Twitch graphics. When you begin the process of organizing all the overlays and graphics for your stream, having an overview of the different upload requirements is essential. You’ll be able to quickly reference this list when sourcing the graphics to make sure they’re compatible.
We’ll cover the requirements for each Twitch graphic in depth throughout this guide including max file size, dimensions, compatible file types, and availability. Dimensions are usually described as Width x Height. The availability requirement is related to streaming levels (Streamer, Affiliate, Partner).
If you’re having trouble meeting any of these recommended requirements we’ll discuss how to optimize your files for streaming further down in this guide. Note that some graphics do not have strict size or dimension requirements. In these cases we’ll simply give you a recommendation from our extensive experience of creating stream overlays and graphics for Twitch.
Twitch Graphics Sizes
| Graphic Type | Dimensions (Pixels) | Max Size | File Type | Availability |
|---|---|---|---|---|
| Twitch Profile Picture Size | 512x512 (px) | 10mb | GIF, JPG, PNG | All Streamers |
| Twitch Banner Size | 1200x480 (px) | 10mb | GIF, JPG, PNG | All Streamers |
| Twitch Offline Banner Size | 1080x720 (px) | 10mb | GIF, JPG, PNG | All Streamers |
| Twitch Panel Size | 320x80 (px) | 10mb | GIF, JPG, PNG | All Streamers |
| Webcam Overlay Size | 1280x720 / 800x600 (px) | 12mb | PNG, WEBM | All Streamers |
| Socials / Labels Overlay Size | 1920X200 (px) | 5MB | PNG,WEBM | All Streamers |
| Twitch Emote Size | 28x28 / 56x56 / 112x112 (px) | 25kb | PNG | Partner/Affiliate |
| Twitch Sub Badge Size | 18x18 / 36x36 / 72x72 (px) | 25kb | PNG | Partner/Affiliate |
| Twitch Cheermote Size | 112x112 (px) | 500kb | GIF | Partner |
| Cheer Badges | 18x18 / 36x36 / 72x72 (px) | 25kb | PNG | Partner/Affiliate |
| Cheer Emote Rewards | 28x28 / 56x56 / 112x112 (px) | 25kb | PNG | Partner/Affiliate |
| Twitch Channel Points Icon Size | 28x28 / 56x56 / 112x112 (px) | 25kb | PNG | Partner/Affiliate |
| Twitch Thumbnail Size | 1280x720 (px) | 5mb | PNG, JPG | All Streamers |
| Twitch Alert Size | 800x300 (px) | 3mb | PNG, WEBM | All Streamers |
| Twitch Chat Box Size | 800x800 (px) | 5mb | PNG, WEBM | All Streamers |
| Event List Size | 800x160 (px) | 2mb | PNG, WEBM | All Streamers |
| Donation Goal Size | 800x160 (px) | 3mb | PNG, WEBM | All Streamers |
Twitch Profile Picture Size
The first graphic in this size guide is the Twitch profile photo. This graphic is an essential part of branding for your Twitch channel. When potential viewers scroll through a list of streamers the only piece of your branding that’s visible is the profile picture.
Images have been proven to be more memorable than written text. Viewers scanning through their follow list or favorite category will notice your profile picture first above all else. As such, it’s crucial that you’re utilizing a profile picture to stay relevant and recognisable amongst a sea of other streamers.
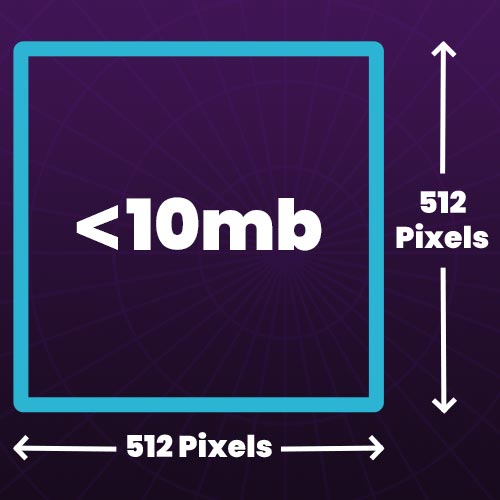
- The Twitch profile pictures should be sized at 512 x 512 pixels (1:1).
- The image file should not exceed 10mb in size.
- The supported file formats for profile pictures are JPEG, PNG or GIF.
Twitch Banner Size
Your channel’s banner on Twitch is a core piece of branding. Located at the top of your channels page, this banner serves as the background for your recent broadcasts, hosting and channel trailer. One important thing to keep in mind regarding the banner is how it’s formatted for different devices. You’ll need a banner that accommodates for different resolutions and screen sizes.
You can get the perfect banner size using our Twitch banner resizer tool.
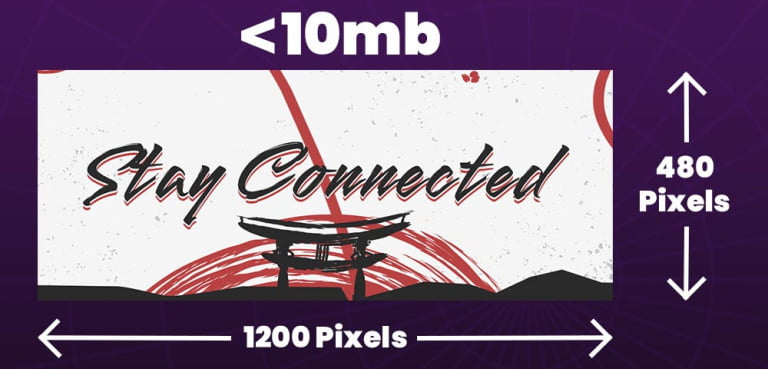
- Twitch banners should be sized at 1200 x 480 pixels (20:8).
- The image file should not exceed 10mb in size.
- The supported file formats for Twitch screens are JPEG, PNG, GIF.
Twitch Offline Banner Size
The offline banner for your channel is shown on your channels page when you’re not live. Viewers that visit your channel when you’re offline will see this banner. It’s a superb way to keep consistent branding and to display important information such as your schedule, or socials whilst offline.
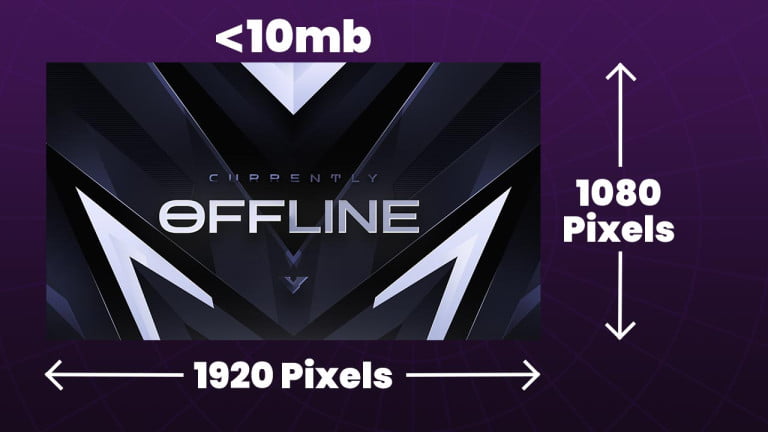
- A Twitch offline banner/screen should be sized at 1920 x 1080 pixels (16:9).
- The image file should not exceed 10mb in size.
- The supported file formats for Twitch offline banners are JPEG, PNG, GIF.
Twitch Panel Size
These small images are perfect for organizing information on your channels page. Panels can be used for extensions, displaying information or links. Whether you’re describing yourself, linking out to sponsors or social media, the panels on your Twitch channel page are the first place viewers check to learn about a streamer. You can easily create such panels using our free panel maker which allows you to create and download your own panels for free.
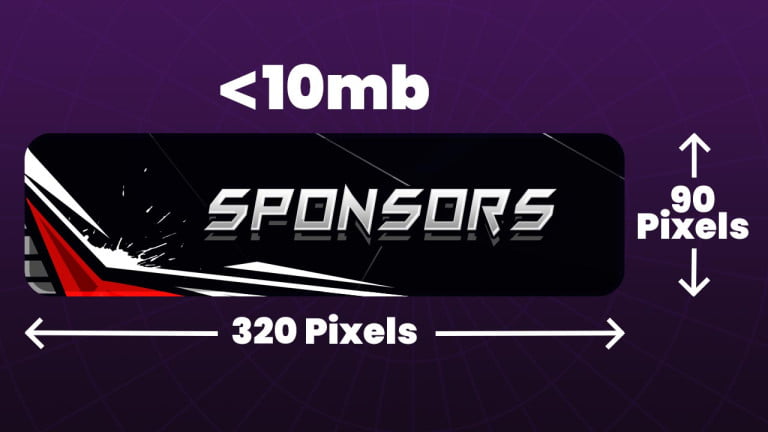
- A Twitch Panel should be sized at 320 x Any pixels.
- The maximum upload size for a panel is not explicitly stated anywhere by Twitch.
- The supported file formats for Twitch panels are JPEG, PNG, GIF.
Note: An Uploaded panels width will always be resized to 320 pixels.
Webcam Overlay Size
A webcam or facecam border is a graphic that surrounds your webcam feed. It’s a widely popular graphic used by the vast majority of streamers. You’ll notice there are two different dimensions given. This is because of the different aspect ratios used for different webcams. Some streamers will even crop their webcam video to fit in a smaller frame.
So far in this guide, the size of each Twitch graphic has had strict requirements. However the dimensions you choose for a webcam are not set in stone. Choose one that works best with your stream layout.
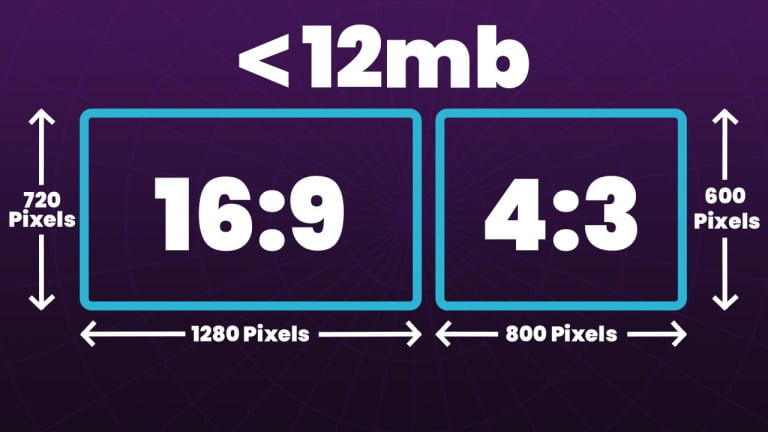
- A webcam overlay should be sized at 1280 x 720 pixels (16:9).
- If you’re using a 4:3 webcam, then use 800 x 600 pixels for the webcam size.
- We recommended the file does not exceed 12mb in size.
- The best file formats for a webcam stream overlay is PNG if the overlay is static and WebM if it’s animated.
Socials / Labels Overlay Size
This useful overlay is usually placed at the top or bottom of a stream. Use it for showing off your socials, or displaying information from stream labels.
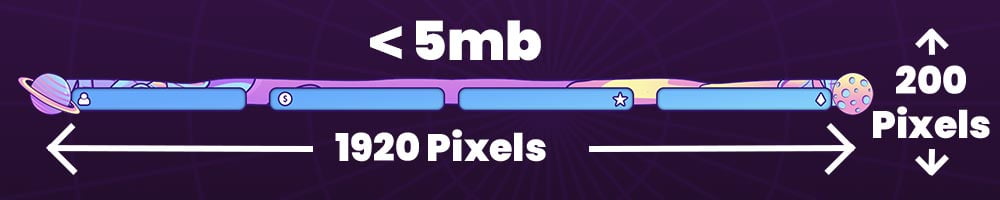
- A top overlay should be sized at 1920 x 200 pixels.
- We recommended the file does not exceed 5mb in size.
- The best file formats for a top overlay is PNG if the overlay is static and WebM if it’s animated.
Twitch Emote Size
Emotes are perhaps the greatest way of adding unique branding and personalisation to your stream. They’re the perfect way to engage your audience and introduce them to your personality. As such it’s very important that the correct dimensions are known before you start designing them. This ensures no time is wasted when they’re ready to be uploaded.
There’s a few kinds of emotes available such as global emotes, cheer emote rewards and cheermotes. Luckily they all have the same size requirements.
If your emotes or badges don’t have the correct dimensions, then check out our Twitch emote resizer.
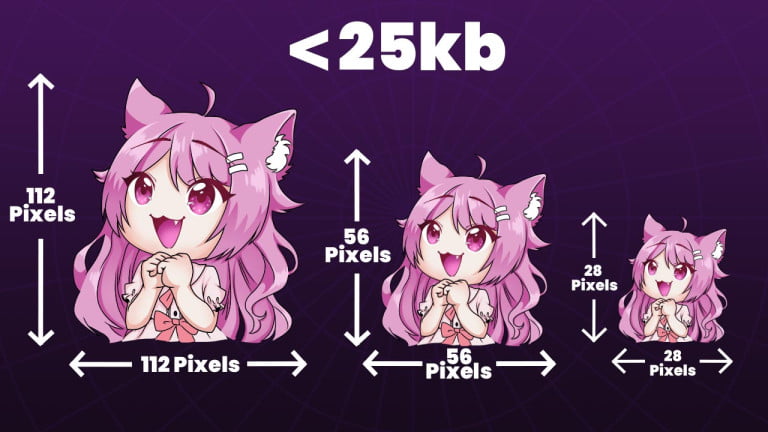
- A Twitch emote should be sized at 112 x 112 pixels.
- The image file should not exceed 25kb in size.
- The supported file format for Twitch emotes is PNG.
Note: If you upload a file using auto resize mode, the image resolution should be between 112×112 pixels and 4096×4096 pixels and have a maximum size of 1mb.
Twitch Sub Badge Size
Twitch subscriber badges are an awesome way to give something back to your community. The tiered system also encourages long term subscriptions from your viewers. There’s another type of badge known as bits badges. These follow the same dimensions guide as subscriber badges shown below.
You can achieve the perfect sizes using our Twitch badge resizer tool.
- A Twitch badge should be sized at 72 x 72 pixels.
- The image file should not exceed 25kb in size.
- The supported file format for Twitch badge is PNG
Twitch Channel Points Icon Size
Channel points are one of the more recent additions to the Twitch platform that takes engagement to a new level. Viewers accumulate these points over time from watching a channel. Those points are only available to use for the channel in which they were earned. The best part is being able to customize each reward, and even add custom icons.
You’ll need to become a partner or reach affiliate level to utilize these rewards.
- A Twitch channel point icons should be sized at 112 x 112 pixels.
- The image file should not exceed 25kb in size.
- The supported file format for Twitch channel point icon is PNG
Twitch Vod Thumbnail Size
If you’ve got any stand out VODs on your channel you can now upload custom thumbnails to really grab people’s attention. Whilst thumbnails on Twitch are not nearly as important as say YouTube, they’re still a great way to make your channels page look more professional and well laid out.
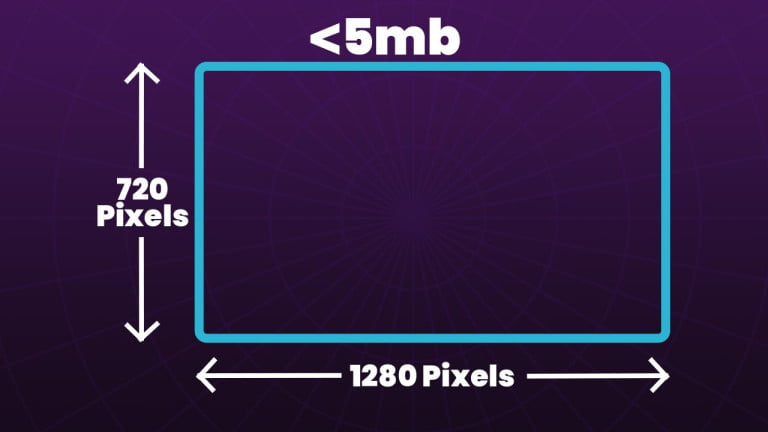
- A Twitch VOD thumbnail should be sized at 1280 x 720 pixels.
- The image file should not exceed 5mb in size.
- The supported file format for Twitch channel point icon is PNG & JPEG.
Twitch Alert Size
Seeing alerts on Twitch is pretty much a given at this point. Although they’re not required for streaming, they’re one of the best ways to encourage engagement from an audience. They’re best utilized by making them unique to your branding and persona.
Similar to some other Twitch graphics in this size guide, there’s no hard and fast rule about the dimensions required for alerts. The Twitch alerts in our store use our recommended sizes for the best results.
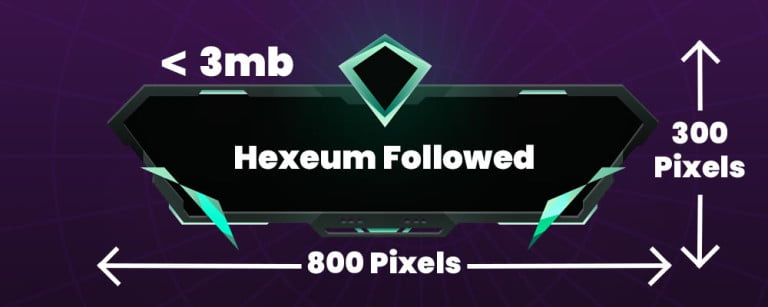
- A Twitch alert should be sized at 800 x 300 pixels.
- We recommend the animation file does not exceed 3mb in size.
- The supported file formats for Twitch alerts are PNG, WebM, GIF.
Note: For animated alerts we highly recommend using WebM file format. It’s used for creating much smaller file sizes that don’t sacrifice quality.
Twitch Chat Box Size
A chat box is a great way to show your chat on stream. There’s quite a few good reasons for adding a chat overlay to your stream. Whatever your reason for using a chat box, it’s important to know what dimensions should be used.
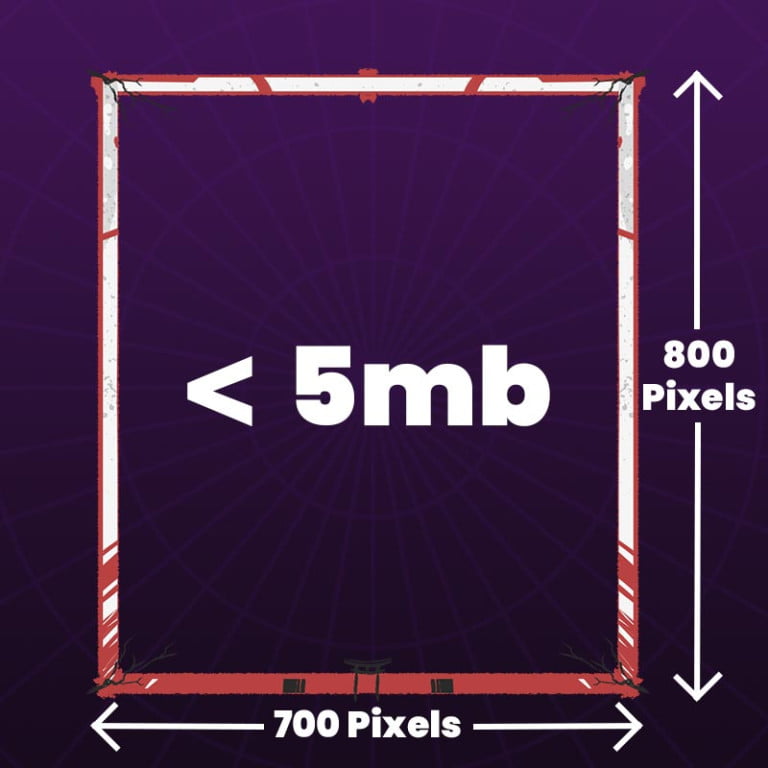
- A Twitch chat overlay should be sized at 700 x 800 pixels.
- We recommend the file does not exceed 5mb in size.
- Our recommended file formats for Twitch chat overlays are PNG & WebM
Notes: The dimensions of a chat overlay will depend on the style you’re going for. We find our recommended dimensions work well for sleek and compact chat box overlays.
Streamlabs/Streamelements Event List Size
The event list is very similar to alerts. However they’re a much more compact and sleek way of showing events. They’re a great option for streamers who get a lot of events and feel like alerts might be better utilized for big stand out events.
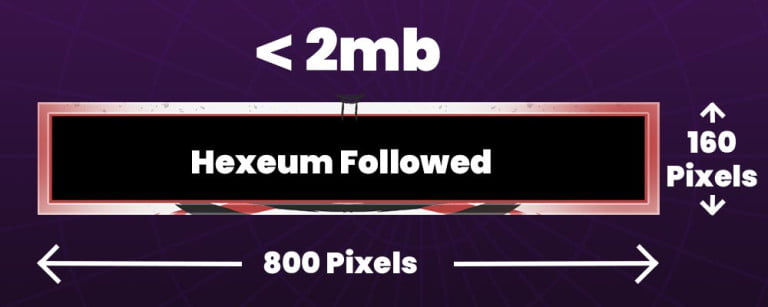
- An event list should be sized at 800 x 160 pixels.
- We recommend the file does not exceed 2mb in size.
- Our recommended file formats for an event list are PNG & WebM
Donation Goal Size
Saving up for a new graphics card ? Share your progress with viewers and let me see how much their contributions are helping you. Donation goals are a way of visualizing these goals and progress made. There are other kinds of goals available such as follower or sub. All of them follow the same recommended guidelines.
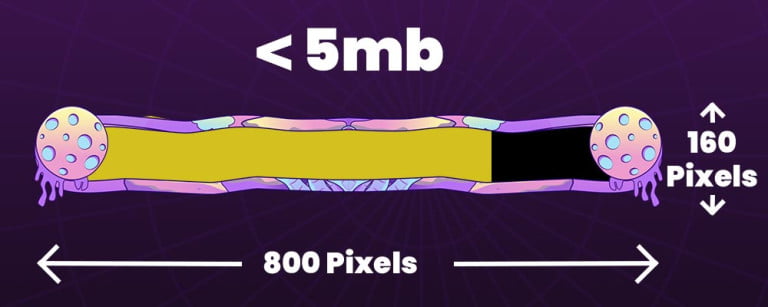
- A donation goal should be sized at 800 x 160 pixels.
- We recommend the file does not exceed 5mb in size.
- Our recommended file formats for an event list are PNG & WebM
Optimising Files
So far in this guide we’ve talked a lot about the best size for files used for Twitch graphics and overlays. If you’re having any troubles with files that exceed these size limits we’ve put together our top tips for reducing the files size.
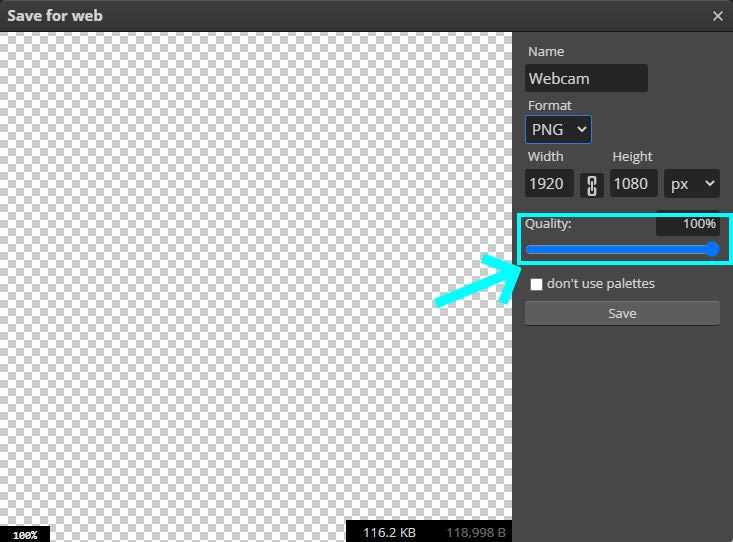
PNG / JPG
If you’re using Photopea or Photoshop you can change the quality during the export process. A lower quality setting will also lower the overall file size. This process will require some trial and error to get the file size just right.
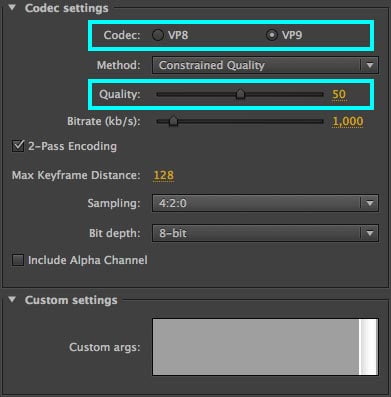
WebM
WebM is by far the best file format for animated files. In this example we’re using a plugin for premiere pro to export the WebM file. We usually convert MOV -> WebM. Both of these files support transparency but MOV files are massive and will really affect performance.
The first setting to tweak is the Quality. If you still can’t get the optimal file size, switch the codec to VP8 and start tweaking the Quality setting again.
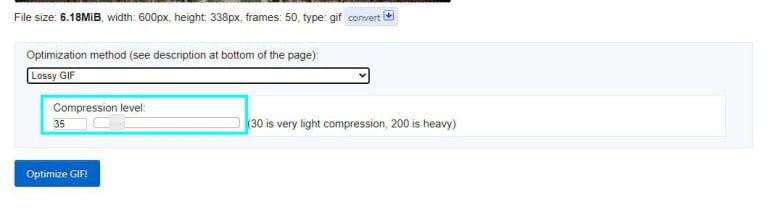
GIF
Getting a GIF file size smaller can be difficult which is why we recommend the WebM file. However if you choose GIF then you can use this online optimiser.
Increase the compression level to make a file smaller. Then select Optimize Gif to proceed with the optimization.
Setting Up Your Twitch Graphics
Getting the sizes for your Twitch graphics is one thing, the next step is actually setting them up and adding them to your channel or stream. Fortunately, we’ve got some handy guides for setting up these different overlays and graphics. The links below will take you directly to each specific guide.
Conclusion
There’s a lot of different graphics to consider when it comes to Twitch channel and stream branding. This guide was designed to help streamers who want to make a Twitch overlay from scratch or streamers that want to confirm the compatibility of premade stream overlay packages.
The guide covered the size and dimensions for all Twitch graphics and overlays. Having the correct file sizes and dimensions takes the hassle out of upgrading your stream. Additionally, making sure you’re using the correct file type for each graphic is very important.
Although some graphics can work in a variety of formats, we always recommend specific file types for the best performance and quality.
Similarly, some overlays featured here don’t have strict recommended file size. However, keep in mind that larger file sizes use up more resources in your PC, and should be the first thing to investigate if you’re running into performance issues.