how to use twitch tts on different platforms

How To Use Twitch TTS on Different Platforms

Text to speech (TTS) enhances audience engagement on Twitch. Streamers use various TTS tools and software, integrating them with donations, channel points, or all chat messages.This guide explores different TTS tools for Twitch streaming. 

It covers selecting a TTS voice, setting up TTS software like Streamlabs, SpeechPro, or StreamElements, and finding the best fit for your streaming style and objectives. Additionally, it includes tips on protecting your stream from disruptive TTS messages that could violate Twitch guidelines.

What is TTS on Twitch?

Text to Speech (TTS) is a technology that converts written text into spoken words using computer-generated voices. This technology is commonly used on Twitch, allowing streamers to enhance viewer engagement and entertainment. 

When viewers donate, subscribe, or send bits, they often attach messages. TTS reads these messages aloud during the stream, sharing them with both the streamer and the audience. Viewers frequently utilize the Text to Speech (TTS) feature on Twitch to send supportive messages, make jokes, or ask questions to the streamer.

TTS tools offer various voice options in multiple languages, enabling streamers to pick a voice that aligns with their stream’s aesthetic. However, it’s important to be cautious as TTS can be misused. We will discuss necessary precautions to protect both the streamer and their community, ensuring a safe and inclusive environment.

Benefits of Using TTS on your Twitch Stream

Using Text to Speech (TTS) on Twitch offers significant benefits, enhancing the streaming experience for both viewers and streamers. Let’s explore these advantages.

    1. Enhance Viewer Engagement: Viewers enjoy having their messages read aloud on streams, particularly when the streamer responds or interacts with them. TTS is a popular tool for viewers to ask questions, make jokes, or show support, as it facilitates these interactions effectively.
    2. Convenience for Streamer: TTS helps streamers stay attentive to chat and donation messages while deeply engaged in a game. It allows them to listen and respond without losing focus on their gameplay.
    3. Increased Donations & Subscriptions: TTS can incentivize viewers to donate or subscribe, as they get the satisfaction of hearing their message broadcasted live. This can be a fun and interactive way for viewers to support their favorite streamers.
    4. It’s Inclusive: Adding TTS to your Twitch stream improves accessibility for visually impaired viewers who prefer audio over text. TTS allows them to hear chat messages, meaning they can still participate in the community.
    5. Entertainment Value:  Memes, copypasta and inside jokes are all part and parcel of enabling TTS on your stream. This adds a humorous side to your streams that viewers love to get involved with.

How To Set Up Twitch Donation TTS with Streamlabs

Streamlabs’ Text-to-Speech feature enhances audience engagement and encourages more donations. It’s probably one of the best TTS tools out there evident by how many streamers use it. Here’s how to set it up:

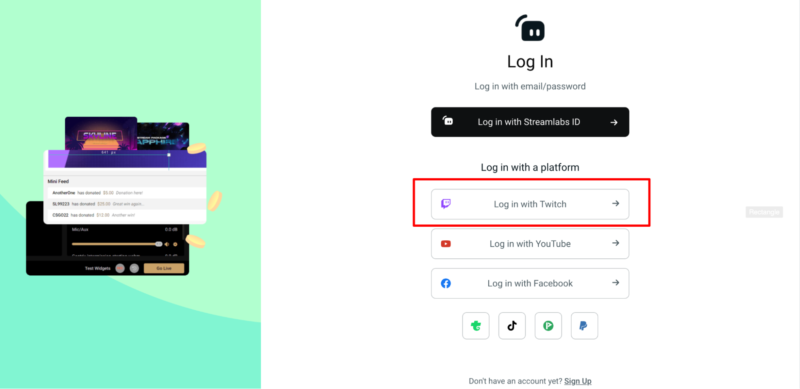
    1. Log into Streamlabs: If you’re new to Streamlabs, sign up using your Twitch account. This will automatically integrate your account with Streamlabs.

      log in to streamlabs via twitch

    2. Access Donation Alert Settings: In the Streamlabs dashboard, navigate to your donation alert settings. You can go there directly or select ‘Alert Box’ from the sidebar. Choose the ‘Donations’ tab to access Text to Speech Settings.

      tts settings in streamlabs

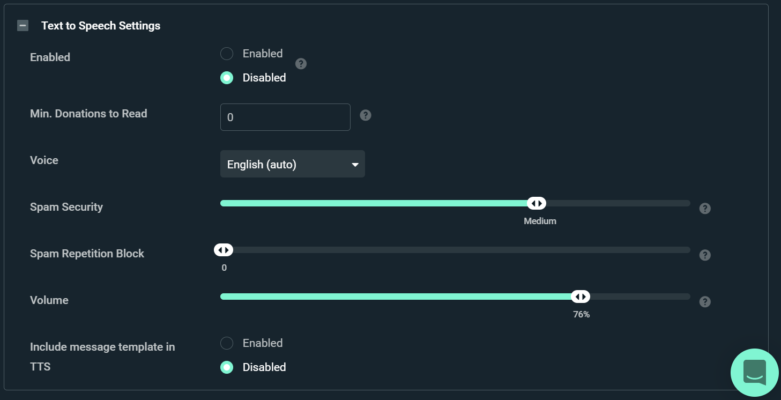
    3. Configure TTS Settings: Ensure TTS is enabled. You can adjust the volume in this panel. The ‘Voice’ dropdown menu offers various languages and accents for reading donation messages.

    4. Test Your Alerts: After setting up TTS, test the alerts to ensure they work as expected. Make any necessary adjustments.

Note on Safety: Broadcasting messages can be risky. Streamlabs allows you to adjust profanity settings for donations to prevent unwanted content. Always ensure your content adheres to the terms of your streaming platform.

How To Set Up StreamElements TTS

StreamElements can help you boost engagement on your videos by enabling the Twitch TTS option. 

Here is a step-by-step guide to enable TTS from Streamelements:

    1. Log in to StreamElements and go to your dashboard. You can access it by clicking your avatar in the top right and selecting Dashboard.
    2. Select Streaming Tools -> Overlays from the sidebar on left.

      streamelements overlay selection

    3. Create a new alert overlay from the overlays page, then click edit.
    4. Select the Settings within the overlay editor from the left sidebar. Select the gear icon on one of the alerts.
    5. To activate TTS, scroll down and select TTS settings and toggle Enable text-to-speech. Within this settings panel you can change the volume, change the voice of your liking, create delays, and choose the minimum amount required to trigger a TTS message.
    6. Now save the overlay by selecting Save in the top right of the overlay editor.
    7. Then, copy the URL by selecting the link icon in the top right next to the Preview button. Now paste the URL into a browser source in your streaming application.

Note: We advise configuring TTS in its own overlay because the store redemption widget designed for TTS should be present in the overlay. Be careful to delete any other store redemption widgets that are present in the same set but in other overlays. The TTS redemption widget will play all alerts or messages associated with a stream store redemption.

How To Enable Twitch Chat TTS with Speechchat

SpeechChat is a tool for Twitch that converts all chat messages into spoken words, greatly aiding viewer accessibility and streamer convenience. If you’re deeply focused on your content, you might overlook the chat, but with TTS, you won’t miss a message.

Here is a step-by-step guide to enable TTS from SpeechChat:

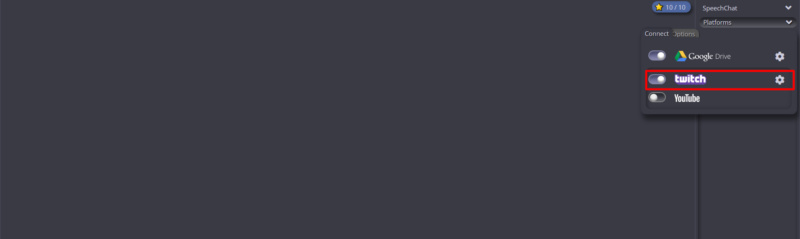
    1. Visit the SpeechChat official website and select Connect in the upper-right corner of the page.
    2. After you click Connect, a drop-down menu with the choices Twitch, YouTube, and Google Drive will appear.
    3. Enable Twitch by turning the Toggle next to the Twitch button.

      speechchat enable

    4. Next, you need to give SpeechChat permission to access your Twitch account. Tap Authorize to give permission. You’ve now connected SpeechChat to your Twitch account.
    5. Next, click the Control Panel link located in the top-right section of the page. To enable text-to-speech, select Voice > Enable Voice.
    6. Go to the control panel in SpeechChat and select the Voice Tab option.
    7. Select your preferred voice type under the Voice Tab. Configure the shortcut key for Twitch’s TTS option as well.

How To Avoid Abusive Comments When Using Twitch TTS

As a live streamer on Twitch, you will be well aware that donations are not always positive, and you want to avoid broadcasting those negative comments out to your audience. When viewers have the freedom to say what they want, it’s inevitable for someone to try their luck sending hateful or unwanted donations which may violate the terms of service for Twitch. 

To avoid abusive content and characters in your Twitch stream, you can add filters that suppress the hateful or rude language. Profanity filters for TTS can be configured in whichever application you are using to broadcast the TTS voice. E.g Streamlabs or Streamelements.

Here are the steps to enable the profanity filter from Streamlabs:

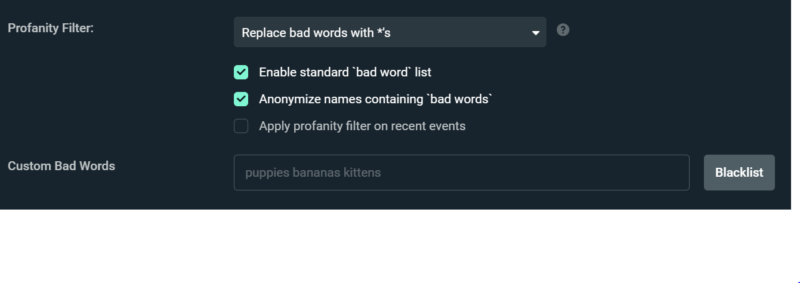
    1. Go to the General Settings tab for your Alert Box. Scroll down until you see the

      Profanity Filter settings. You can enable the standard bad word list, to filter the most commonly used bad words.

      tts profanity filter in streamlabs

    2. You can add more control to the profanity filter by adding additional inappropriate words into the Custom Bad Word field. Each word should be separated by a space. Once finished click Blacklist.
    3. To save your changes click Save Settings and your profanity filter settings will be saved. 

How To Use Twitch TTS with Channel Points

If your Twitch stream has an average viewership of 10 to 20 people, donation-based Text to Speech might not see much use. An active chat is often key to retaining and attracting viewers. If your stream doesn’t engage viewers effectively, growing or maintaining your audience can be challenging. In this context, channel points can be a game-changer for boosting engagement.

Integrating TTS with channel point redemptions can greatly enhance your Twitch stream. It allows viewers to use TTS through channel points instead of money. This feature is particularly beneficial for viewers who want to support the streamer but may not have the financial means to do so.

Here’s a brief guide to set up TTS with channel points:

    1. From your Creator Dashboard on Twitch, expand Viewer Rewards -> Channel Points.
    2. Find the Custom Rewards section and select the Create a Custom Reward button. 
    3. Include a name for the reward and in the description explain to people what this reward does, as a lot of people won’t know that a TTS reward is even possible.
    4. Enable the Require Viewer to Enter Text option.
    5. Set an amount needed to redeem the reward in the Cost field.
    6. Finish up by clicking Create.
    7. Now head over to Isaiha Creati’s tool and log in using your Twitch account, then Go To Dashboard.
    8. You can now see your channel point rewards, click Edit on the TTS reward you have previously set up.
    9. From the new dialog select Add Feature, open the Select Module dropdown and click Text To Speech.
    10. Now you can find some familiar TTS settings such as volume, profanity filter and voice selection. 
    11. Once configured you close the dialog using the X button in the top right.
    12.  Select the Show Alert URL button and copy the URL that shows.
    13. Open up OBS, and add a browser source to your scene, and paste in the URL.

Testing Twitch TTS Voices With LazyPy

To experiment with Twitch Text to Speech (TTS) messages, you can use LazyPy.ro. This tool offers a wide range of TTS voices from popular platforms like StreamElements, Streamlabs, and TikTok. You can select from various languages, genders, and styles.

To test a voice, type a message in the text box and click “Say It.” This generates an audio message, allowing you to preview how it will sound. You also have the option to download the audio.

How To Increase Engagement with Twitch TTS?

The following ideas can help you improve the experience for your viewers:

    • Give your dedicated followers channel points to establish a long-term connection with them.
    • Customize your TTS features to manage your streams and prevent spam.
    • Consider setting a low minimum donation requirement for text-to-speech activation to prevent trolling. The price you set depends on your popularity, however one dollar is a great starting point to encourage subscribers to support your channel.
    • Select a TTS program that is simple to use and offers Twitch TTS voice options.

Conclusion

Activating TTS on Twitch is a great way to boost viewer engagement, encourage donations and build a community around your channel. This fun feature is one of the best tools for Twitch streamers looking to liven up a stream, make more people laugh and create clip worthy moments during your stream. It helps with channel development and improves audience participation. Now that you know the benefits of integrating TTS into your Twitch account, what are you waiting for? Try it out right now!

This entry was posted in .

Picture of Liam Doherty

Liam Doherty

Liam Doherty comes from game development background, initially exposing him to the world of content creators. In 2017 he decided to dive headfirst into the creators realm, offering solutions for branding and creating better content.

Related Posts

PREMIUM OVERLAYS