No products in the cart.
How to Set Up Donations on Twitch: A Complete Guide
- January 23, 2024
- by Liam Doherty
In this comprehensive guide, we delve into the world of Twitch donations – a crucial revenue stream for streamers, especially those not yet at affiliate or partner requirements. From leveraging popular platforms like Streamlabs and PayPal to exploring Twitch’s native options like Bits and Cheers for affiliates and partners, we cover it all. Additionally, we discuss setting up donation links, using alternative platforms, and even accepting cryptocurrency. Plus, we’ll tackle important considerations like tax implications, ensuring streamers are well-informed and prepared for financial success.
What Are Donations on Twitch ?
Donations are a crucial monetization path for growing Twitch channels, particularly for creators not yet at affiliate or partner status. This system allows streamers to earn income directly from their audience. Reaching affiliate or partner levels unlocks additional revenue streams like Twitch Bits and Cheers, exclusive to these tiers.
For streamers still building their presence, setting up donations through platforms like Streamlabs, PayPal, or Streamelements is a practical strategy. These services provide a vital revenue stream, essential for non-affiliates and non-partners in their channel growth journey.
It’s worth noting that while Twitch doesn’t take a cut from donations, the external platforms managing these transactions usually charge some fees, typically deducted automatically.
How To Enable Twitch Bits & Cheering
Important: This option is only available for Twitch partners & affiliates. Non affiliates should refer to the Streamlabs sections
Bits are Twitch’s virtual currency, which viewers can buy to Cheer on their favorite streamers. A Cheer is essentially a chat message that incorporates Bits, showing support for the streamer and creating a fun, interactive experience for viewers. You can start receiving donations through Bits and Cheering once you reach affiliate status on Twitch. Here’s the process:
- Sign into your Twitch account and navigate to the Creator Dashboard.
- Select ‘Settings’ on the left side, then click ‘Affiliate’.
- In the ‘Bits & Cheering’ section, toggle the switch to enable Cheering with Bits.
After enabling this feature, viewers will be able to buy Bits and use them to Cheer in your channel’s chat. Twitch compensates you for the Bits used in Cheers, thus providing a revenue stream.
How To Setup Donations On Streamlabs
Streamlabs stands out as the preferred platform for content creators, offering an optimal solution for receiving donations and tips. This effectiveness stems from its ‘tipping page’ feature, renowned for its high customization and ease of use in handling donations. The platform’s widespread popularity is bolstered by its seamless integration with essential streaming tools and features, like stream alerts and widgets. Moreover, Streamlabs, being specifically designed for content creators, offers robust protection against prevalent issues like PayPal chargeback scams, making it a secure and reliable choice for streamers.
Setting up donations with Streamlabs involves a few straightforward steps:
- Create or Log In to Your Streamlabs Account: If you don’t already have a Streamlabs account, create one. If you do, just log in.
- Link Your Twitch Account: Connect your Streamlabs account to your Twitch account. This can be done through the Streamlabs dashboard -> Account -> Settings, by selecting the option to link your Twitch account.
- Set Up Your Donation Settings: In the Streamlabs dashboard, navigate to the ‘Donation Settings’ section or “Tipping” as it’s displayed in the sidebar. Here, you can configure your donation settings, including payment methods.
- Choose Payment Methods: Select the payment methods you want to accept for donations, such as PayPal, credit cards, and other available options.
- Customize Your Donation Page: Streamlabs allows you to customize your donation page. You can add personalized messages, images, or thank you notes to make the page more engaging for your donors.

- Add Donation Link to Your Twitch Channel: Once your donation page is set up, copy the donation link provided by Streamlabs. add the donation link to your Twitch channel. For detailed steps on this, see “How To Add A Donate Button To Your Twitch Channel”

- Test the Donation Process: It’s a good idea to test the donation process to ensure everything is working correctly before going live.
How To Setup Donations With StreamElements
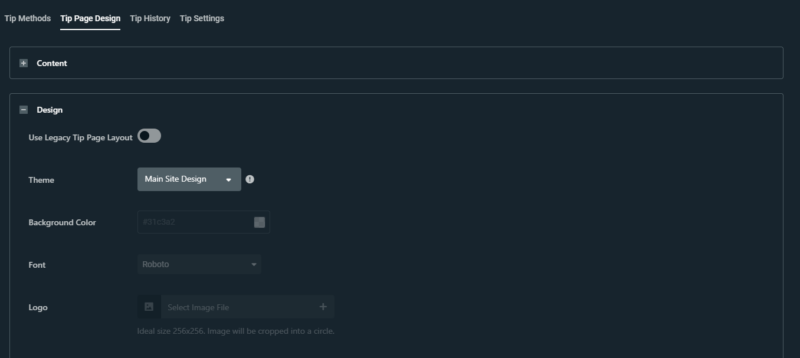
Another popular platform with helpful tools for generating revenue is StreamElements. They include a wide variety of widgets, such as the HypeCup. Not only do they have widgets to encourage tipping, but you can build your very own tipping page. By using this tipping page, when viewers want to donate they will first land on your tipping page. From here they can enter the donation amount and message. This is a great way to build a tip page in lieu with your branding.
To set up a donations page on StreamElements follow the steps below.
- Create or Log In to Your Account: Head over to StreamElements and log in.
- Link Your Twitch Account: Connect your StreamElements account to your Twitch account. This can be done through the Streamelements dashboard by clicking your profile avatar and navigating to your account settings.
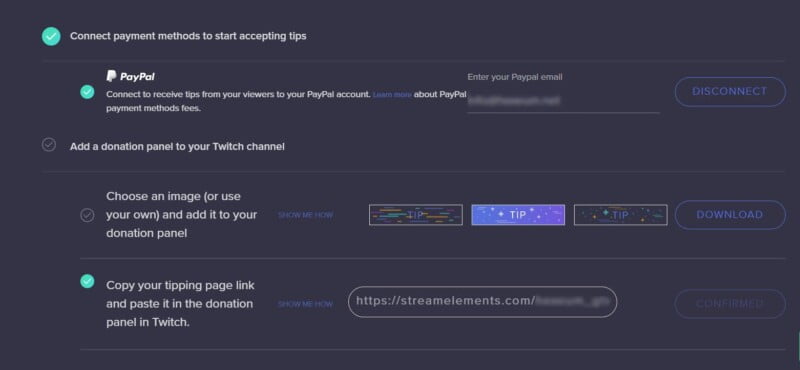
- Link To PayPal: In the Streamelements dashboard, navigate to the Revenue -> Tipping Settings from the sidebar. Here, you can configure your donation settings by linking to your PayPal account.

- Customize your Donation Page: Streamelements allows you to customize your donation page. You can add personalized messages, images, or thank you notes to make the page more engaging for your donors.
- Add Donation Link to Your Twitch Channel: Once your donation page is set up, copy the donation link provided by Streamelements. add the donation link to your Twitch channel. For detailed steps on this, see “How To Add A Donate Button To Your Twitch Channel”

- Test the Donation Process: It’s a good idea to test the donation process to ensure everything is working correctly before going live.
How to Configure PayPal Donations for Twitch
PayPal remains a popular choice for Twitch streamers when it comes to accepting donations. This popularity stems from its wide accessibility and user-friendly nature. While it’s no longer the go-to platform for donations, it still sees significant use, particularly among users who may not have access to some of the other available options.
To set up PayPal donations with Twitch:
- Create a PayPal Account: If you don’t have one, sign up for a PayPal account.
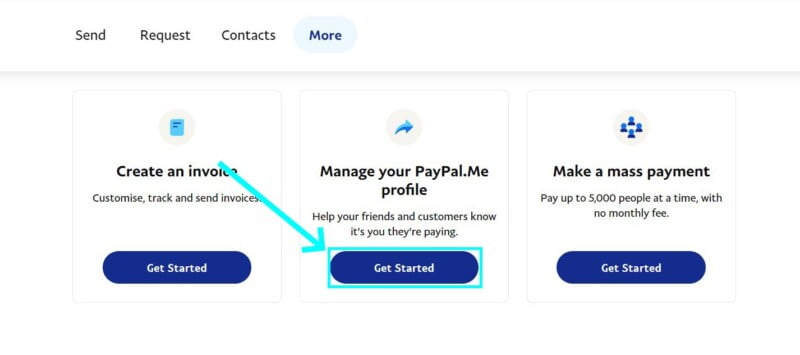
- Setup Paypal.me: Once logged in head over to the Pay & Get Paid from menu then select the More tab. Select Get Started under the Manage your PayPal.Me profile section.

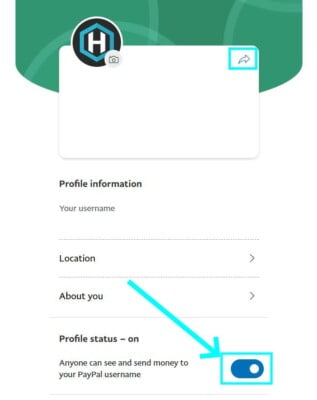
- Enable Your Profile: Once set up, you’ll need to make sure your profile status is set On.

- Get Your Donation Link: Select share from the top right. Share your PayPal donation link with your viewers and encourage support during your streams. Scroll down and find the Copy Link button.

- Add Donation Link to Your Twitch Channel: With the link copied, add it to your Twitch channel. For detailed steps on this, see “How To Add A Donate Button To Your Twitch Channel”
Important Note: One major drawback of using PayPal to accept donations is the prevalence of chargeback scams. In these situations, individuals donate money and then initiate a chargeback, often with PayPal siding in their favor. This can result in a chargeback on your account, causing significant frustration for streamers. As a result, many streamers explore alternative donation platforms despite the popularity and user-friendliness of PayPal.
How To Add A Donate Button To Your Twitch Channel
Once you’ve obtained your donation link, it’s important to effectively promote it on your channel. Merely placing a plain donation link in your channel can seem unprofessional and inconvenient, as it forces viewers to manually copy and paste the link. A more polished and user-friendly approach is to use a donation button or panel.
To add a donation panel/link to your Twitch channel, follow these summarized steps:
- Log into Twitch: Access your account by logging in.
- Navigate to Your Dashboard: Go to your Twitch Creator Dashboard.
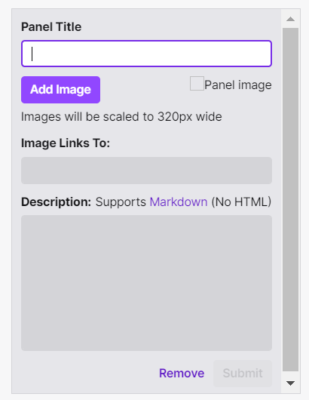
- Edit Your Panels: Click on the “Channel” tab, select “About” from the dropdown menu, and then choose “Edit Panels.”
- Create a New Panel: Click the “+” button to add a new panel.
- Set Title and Description: Enter a title and description for your donation panel, clearly explaining its purpose.

- Insert Donation Link or Image: Use the “Add Image or URL” option to add your donation link, button, or image, ensuring your donation URL is included.
- Customize the Panel: Adjust the panel’s appearance, including color, text, and layout, to fit your channel’s theme.
- Save Your Panel: Once you’re happy with the panel’s look, save your changes.
- Rearrange Panels: If necessary, rearrange your panels to your liking by dragging and dropping them into place.
- Activate the Panel: Make sure your new panel is enabled by toggling it on.
- Test Your Donation Link: Click on the panel to test if the donation link works correctly, ensuring it leads to the appropriate donation page.
- Publish Your Changes: Finalize your updates by clicking “Done,” making your new donation panel live on your channel.
Finding Free Donation Buttons

If you’re in need of a free donation button for your Twitch channel, we’ve got you covered with an extensive collection of free Twitch panels. Alternatively, for a more personalized touch, you can create your own using our free Twitch panel maker. Our professional-grade panels are designed for easy uploading to your Twitch channel, ensuring a smooth integration.
These panels not only enhance the professional look of your channel but also offer a seamless experience for your viewers, making it easier for them to support your content. With these tools, you can elevate your Twitch presence and make your channel stand out.
Accepting Cryptocurrency Donations On Twitch
Cryptocurrency, with its rising popularity, has become a widely accepted alternative form of payment globally. Whether you’re drawn to its decentralized nature or you’re in a country where traditional donation platforms like PayPal are less accessible, cryptocurrency offers a versatile solution. It’s particularly useful for Twitch streamers looking for diverse ways to receive support, appealing to a broad audience that appreciates the flexibility and innovation of digital currencies.
- Set Up a Cryptocurrency Wallet: First, you need to create a cryptocurrency wallet that supports Bitcoin and other cryptocurrencies. Popular options include Coinbase, Binance, and Exodus.
- Secure Your Wallet: Ensure your wallet is secure. Use strong passwords and enable two-factor authentication for added security.
- Generate a Receive Address: In your wallet, generate a ‘receive’ address for Bitcoin or other cryptocurrencies you wish to accept.
- Create a Donation Panel on Twitch: Go to your Twitch channel and create a new donation panel. This is where you’ll provide information about your cryptocurrency donations.
- Provide Your Receive Address: In the Twitch donation panel, include the receive address from your cryptocurrency wallet. Be clear that this address is for Bitcoin or other cryptocurrency donations.
- Add a QR Code (Optional): For added convenience, generate a QR code of your receive address and add the image to your donation panel. This allows viewers to easily scan and send donations.
Alternative Platforms to PayPal for Receiving Donations
Beyond the major platforms like Streamlabs, StreamElements, and PayPal, there are several other services that enable streamers to monetize their content by accepting donations. Let’s explore these alternative platforms, highlighting some of their unique and interesting features.
Ko-Fi
Ko-fi is a platform that allows creators to receive donations and sell digital products without a subscription model. It’s like a virtual ‘tip jar,’ where supporters can make one-time contributions to show their appreciation.
Key Features:
- No Fee Structure: Unlike many platforms, Ko-fi doesn’t take a cut from the donations received.
- One-Time Donations: Allows for flexibility, as supporters can make single contributions without commitment.
- Content Sales: Creators can sell digital products, commissions, and offer exclusive content.
Tipeee
TipeeeStream is a donation platform specifically designed for live streamers. It’s known for its seamless integration with popular streaming software, making it a favored choice for streamers looking to enhance their live streaming experience with donations.
Key Features:
- Integration with Streaming Software: TipeeeStream easily integrates with major streaming platforms, offering a smooth experience for both streamers and viewers.
- Custom Alerts: The platform allows for personalized donation alerts that can be displayed during live streams, adding an interactive element to the streaming experience.
Buy Me A Coffee
Buy Me a Coffee is a donation-based platform that stands out for its simplicity and casual approach. It provides a way for fans to support their favorite creators through small, one-off donations, akin to buying them a coffee.
Key Features:
- Ease of Setup: The platform is user-friendly, allowing creators to set up their page quickly and start receiving donations with minimal hassle.
- Community Engagement Tools: Buy Me a Coffee includes features that foster interaction and engagement, such as comments and ‘thank you’ notes, enhancing the connection between creators and their supporters.
How To Incentivise Donations on Twitch

To get more donations on your Twitch streams, it helps to think about what makes viewers want to donate. Some people will donate just because they like your content, but others might need a little nudge. Make sure they know they can donate and tell them how their donations help you out. Here are some straightforward tips on how to make your donation link work better for you.
- Clearly Display a Donation Button: Make it easy for viewers to donate by adding a prominent donation button to your Twitch channel. This button should link directly to your donation page, ensuring a hassle-free donation process.
- Engage with Donations Live: During your live streams, actively engage Twitch viewers by showing appreciation to donors. Acknowledge and thank them, perhaps by reading their messages or names aloud. Utilize top donation leaderboards and shout-outs, and consider offering exclusive content as a token of gratitude.
- Set Donation Goals with Rewards: Create specific donation goals and offer rewards once those goals are reached. These could be special events, giveaways, or community challenges.
- Utilize Donation Alerts: Implement on-screen alerts for every donation you receive during your live stream. These alerts can be customized with animations, sounds, and personalized messages.
- Incorporate a Donation Goal Widget: Use a donation goal widget on your stream, showing the progress towards a specific financial target.
Tax Implications for Twitch Streamers: Managing Donations
Alright, before we wrap up, let’s touch on an important piece: taxes on your donations. It’s crucial to understand how these affect you at tax time. Handling this correctly keeps you in the clear and avoids any surprises. Let’s quickly go over what you need to know about taxes on your streaming income.
1. Understanding Taxable Income on Twitch
Your income from Twitch, including donations, subscriptions, and ad revenue, is taxable. Anything you earn from your streaming is seen as income by tax authorities. Remember, everything counts – from bits and subs to ad income. Accurately accounting for every source of income is essential for managing your taxes effectively.
2. Effective Record-Keeping
Tracking all your Twitch income is crucial. Accurate records simplify tax processes and help avoid complications. Tools like spreadsheets, financial software, or apps designed for online income tracking can be incredibly helpful. Organizing your finances helps eliminate guesswork and eases tax preparation.
3. Seeking Tax Advice
Consider consulting a tax professional if your Twitch finances become complex, such as dealing with international donations or multiple income streams. A tax expert can guide you through these complexities, ensuring you stay compliant and informed.
4. Tax Payment Strategies
To manage taxes efficiently, it’s wise to allocate a portion of each donation for tax purposes. For self-employed streamers, making estimated tax payments throughout the year can prevent large tax bills later. This proactive approach helps maintain financial stability and peace of mind during tax season.
Conclusion
In conclusion, mastering the art of accepting donations on Twitch is a key step towards financial success for streamers. Whether you’re just starting out or looking to expand your revenue streams, understanding the various platforms and methods available—from Streamlabs and PayPal to Twitch’s own Bits and Cheers—is essential. Remember to display your donation link effectively, engage with your audience, and stay informed about the tax implications of your earnings. By embracing these strategies and tools, you can enhance your Twitch presence, build a stronger connection with your audience, and pave the way for a thriving streaming career.
This entry was posted in Guides.
Liam Doherty
Liam Doherty comes from game development background, initially exposing him to the world of content creators. In 2017 he decided to dive headfirst into the creators realm, offering solutions for branding and creating better content.
Hexeum
© 2025 Hexeum. All rights reserved
Login
Register
We use cookies to ensure that we give you the best experience on our website. If you continue to use this site we will assume that you are happy with it.OkNoPrivacy policy

